Loading
Optin Forms
- Optin forms are the quickest and easiest way to connect and convert your website visitors to customers, using interactive action based Optin firing events and pre coded automations its very quick to start building email list. To create new Optin form, go to top right menu and click on Optins, then click the + sign on that page, or you can also go to this page by clicking the shortcut on topright + icon and choosing New Optin from that menu there. For easy understanding we have split the whole process of creating Optin form into 7 simple divisions and each one along with the available options in each are explained.
Themes
- Here you start your Optin form, choose a template/theme of your choice from our theme library and click select button on that to start customising it, if you dont choose any theme then default theme is selected. Animation is the displaying animation for this Optinform when it is integrated n your ebsite, choose the type of animation you prefer and move to next tab.
Editing
- This is where the real customisation begins, change the colors, change the text, alter images and backgrounds, enable/disable fields and much more. Background Color is the color of background in your Optin form, change this to the color you prefer. Background Image lets you to set an image as background for your Optin form, go creative. Enable Name Field is a toggle switch which will enable/disable name field and show/hide corresponding attributes of name field. Name Placeholder This is placeholder for name field in the form. Color is color of text in name field in Optin form. Size is font size of text in name field in Optin form. Font is font family of text in name field, you can choose different fonts to apply to your fields using this. Enable Field Toggle, place holder, color, font, and size are same for the email field, phone field and submit button, there are some extra attributes for button like background color Button Background is the background color of submit button First Image URL is where you can put the URL of first image that is to be replaced in the form Second Image URL is where you can put the URL of second image that is to be replaced in the form Editing HTMLYou can edit the text appearing on Optin forms, all you need to do is direct click on the text and you will see an inline editor right there with all the text formatting options and font customisation features.
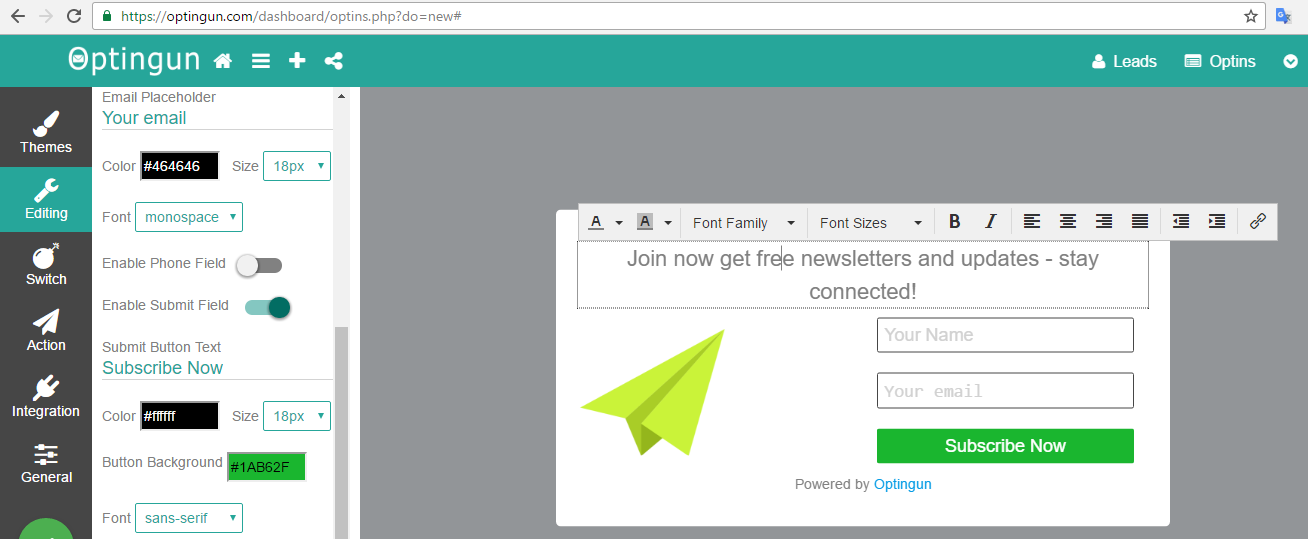 Note Its possible to have maximum of two images in Optin form, and these are configured in themes, if your theme supports images then you will see options to change the URL of images, and all of the above fields are configured in theme so if you dont see these options in your slected theme then your selected theme doesnt support them
Switch
- This is where you put your creative ideas to engage with your customers and create firing actions for your Optin forms
When to Fire Optin
this select box offers you a list of option to show your optin on user interactions On Page Load this is the default one and this displays the Optinform as soon as the webpage loads into customer browser. After Set Interval this will ask another value on selecting, you need to set the delay of time in seconds so the Optin form is displayed after the set interval here. On Leaving Page is what exit-intent action, when visitors leave your website this action is fired and your form is displayed immediately and this is the most effective Optin firing event for capturing leads with great conversions. On Scrolling set pixels, using this you can fire dsplaying forms when visitor scrolls to certain level, this works better when you want to attract users who scroll and read your articles. On Scrolling to End will display Optin form when the webpage is scrolled to end. On Clicking on Element is used to fire Optin forms when visitors click on a selected element, say contact link or subscribe form or anything, just set the selector of the element and it works the rest, selector can be element name or ID or class of that element, and you need to add classes with a "." like ".class_name_of_element" and add IDs with a "#" like "#ID_name_of_element". On hovering on Element is used to fire Optin forms when visitors move mouse on a selected element just like the above event. note after selecting your choice of firing event you need to select "Add this Rule" button down there to add the rule to the configuration which will display in the right section of rule list.Optin Delays
Time(secs) to show Optin again when previous Optin Closed is used to control the time to show the optin again to that visitor from the time of clicking close button, the default value is 86400 seconds which is equal to One day, you can change this to any time and this value is in seconds.
Time(secs) to show Optin again after Successfull Optin is used to control the time to show the optin again to that visitor from the time of last submission, the default value is 86400 seconds which is equal to One day, you can change this to any time and this value again is in seconds fr precise control.
Action
- This is where you define what to do on successull Optin, when some visitor fill the Optin form you decide what to do with that data here Show Thank You Message is a toggle switch using which you can decide whether to show or hide the success message on successful optin. Turning this On will show another field where you can enter text to display as success message Message is where you do that, enter the success message you want to show to your visitors on successfull optin Redirect to another page is another toggle switch which will enable redirection after Optin submission Redrect URL, using this you can decide where to redirect after successful optin. Add Data on Redirect URL, Turning this toggle on will add the visitor entered data to the redirect URL so the landing page can use the data and process further. Send HTTP Notifications is a Toggle switch turning this on will send visitor data via HTTP notifications to set destinations when ever a successful optin happens, to let thirdparty apps to work better. Notification URL, this is where you set the destination where you would want the notifications to sent. Save Leads on Optingun will save the Lead information in Optingun dashboard, if you turn this off then any lead captured by this Optin will not be saved in Optingun and will not be available in list of Leads.
Integration
- Here you can integrate your Optin forms directly with any of your auto responders or CRM softwares, select the available softwares from the list and enter the API/list details to add the leads to and click "Add Integration" button once you put all the required details in there. any added integrations rules will be displayed in the right side column if set.
General
- In this section you are going to control the general things of Optin form. Name of Optin is where you can set a specific name for your Optin form, this is only for your personal identification and has nothing to deal with Optin functionality Show in Desktop is a tickbox, ticking this will show Optin forms in Desktop devices and unticking will hide. Show in Mobile is a tickbox again, ticking this will show Optin forms in Mobile devices and unticking will hide which will help targeting users from specific devices.
- you are free to play with any of the above tabs and configure the theme just the way you want it to match your purpose and website
click on Create button to finish creating the Optin form, all the Optin forms will be listed under Optins in your dashboard.